Difference between revisions of "Bloomery"
EERussianguy (talk | contribs) (preliminary page creation) |
m (→Usage: Generalize; the items may not be ore lumps) |
||
| (4 intermediate revisions by 2 users not shown) | |||
| Line 1: | Line 1: | ||
| − | = | + | {{SideInfoBox Object |
| − | + | | largeimage1 = {{BlockImage|Bloomery}} | |
| − | + | | invimage1 = Bloomery | |
| − | {| | + | | tool = pickaxe |
| − | | | + | | stacksize = 1 |
| − | | | + | | size = Large |
| − | | | + | | weight = Very Heavy |
| − | | | + | | renewable = 0 |
| − | | | + | | oredict = None |
| + | | gravity = 0 | ||
| + | | drops = Self | ||
| + | | flammable = 0 | ||
| + | | luminance = 15 | ||
}} | }} | ||
| − | |||
| − | + | The bloomery is both a craftable block and also a large multiblock structure containing the craftable block as a component. | |
| − | == | + | == Bloomery block == |
| + | The bloomery block, which looks and acts like a hatch, is crafted from eight bronze double sheets. The double sheets may be [[Bronze|bronze]], [[Bismuth Bronze|bismuth bronze]], or [[Black Bronze|black bronze]], but all eight must be made of the same metal. | ||
| − | + | == Multiblock structure == | |
| + | {| class="wikitable" style="float: right; margin: 1em;" | ||
| + | |+Building a bloomery | ||
| + | |- | ||
| + | | [[File:Bloomery 1.png|frameless]] | ||
| + | | [[File:Bloomery 2.png|frameless]] | ||
| + | |- | ||
| + | | [[File:Bloomery 3.png|frameless]] | ||
| + | | [[File:Bloomery 4.png|frameless]] | ||
| + | |- | ||
| + | |} | ||
| − | + | The basic multiblock structure is three layers high. The top layer requires four stone blocks surrounding an air block, forming a chimney. The middle layer continues the chimney, but replaces one of the stone blocks with a second air block and adds two additional stone blocks beside that air block. The bottom layer requires only two stone blocks, below the two air blocks of the middle layer. The bloomery block itself must then be placed in the side opening to form an access hatch; if constructed incorrectly, it will not be placeable. The stone blocks can be any kind of stone (including multiple kinds) and in any form (raw, smooth, brick, or even cobble, including mixed forms, though cobble may require additional blocks due to its sensitivity to gravity). The spaces outside the basic structure can be left empty or filled with any material as desired, though the top of the chimney must be left unobstructed. | |
| − | + | Beyond the basic structure, the chimney may be extended by adding one or two more layers identical to the top layer. Doing so expands the capacity of the bloomery to 2× or 3× (respectively) its original value. The chimney does not need to be open to the sky for the bloomery to work; in cold regions, it may be helpful to build a roof over the chimney to prevent snow from accumulating inside the structure when not in use. | |
| − | + | == Usage == | |
| − | |||
| − | |||
| − | |||
| − | |||
| − | |||
| − | |||
| − | |||
| − | |||
| − | |||
| − | == | ||
| − | |||
| − | |||
| − | |||
| − | |||
| − | + | The bloomery can smelt up to 8, 16, or 24 items per use, depending on the chimney height. Each item may be: | |
| − | + | * an iron ore lump | |
| − | + | * a wrought iron tool, tool head, or ingot | |
| + | * an iron bloom from a previous bloomery operation | ||
| − | + | To operate the bloomery: | |
| − | |||
| − | |||
| − | |||
| − | {| | + | # Open the hatch, if necessary, with {{Key|Rmb}}. |
| − | | | + | # Place eight [[Charcoal|charcoal]] at the bottom of the chimney using {{Key|Shift}}+{{Key|Rmb}}. |
| − | + | # Close the hatch. | |
| − | + | # Climb to the top of the chimney. | |
| − | | | + | # Drop the items to smelt into the chimney with {{Key|Q}}. |
| − | | | + | # Drop charcoal into the chimney with {{Key|Q}} equal to the number of items to smelt. Adding too little fuel will prevent the bloomery from lighting. Adding too much will work fine, but wastes fuel. |
| − | + | # Use a [[Firestarter|firestarter]] or [[Flint & Steel|flint & steel]] on the hatch to light the fire. | |
| − | + | # Wait for 15 in-game hours for the smelting process to complete, at which point the fire will extinguish. | |
| − | + | # Open the hatch with {{Key|Rmb}}. | |
| − | |||
| − | |||
| − | + | # Use a [[Pickaxe|pickaxe]] to break the [[Raw Iron Bloom|raw iron bloom]] in the bloomery. | |
| − | + | The iron bloom can then be [[Metalworking Guide#Wrought Iron|worked]] on an [[Anvil|anvil]] into a [[Refined Iron Bloom|refined iron bloom]], split into smaller pieces, and eventually worked into useful items. | |
| − | |||
| − | |||
Latest revision as of 08:27, 29 November 2020
| Tool | |
| Stacksize |
1 |
| Size ⇲ |
Large |
| Weight ⚖ |
Very Heavy |
| Renewable |
No |
| Ore Dictionary |
None |
| Gravity |
No |
| Drops |
Self |
| Flammable |
No |
| Extra Item Data |
See Data |
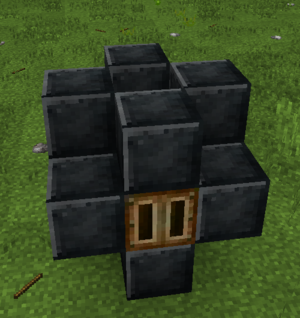
The bloomery is both a craftable block and also a large multiblock structure containing the craftable block as a component.
Bloomery block
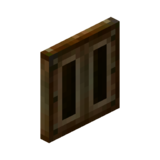
The bloomery block, which looks and acts like a hatch, is crafted from eight bronze double sheets. The double sheets may be bronze, bismuth bronze, or black bronze, but all eight must be made of the same metal.
Multiblock structure
|
|
|
|
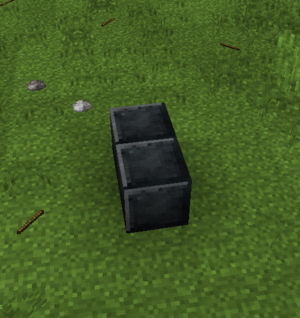
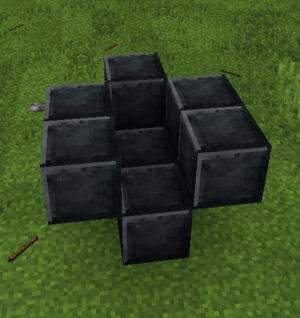
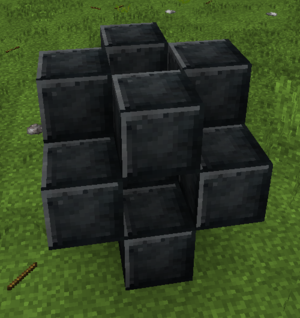
The basic multiblock structure is three layers high. The top layer requires four stone blocks surrounding an air block, forming a chimney. The middle layer continues the chimney, but replaces one of the stone blocks with a second air block and adds two additional stone blocks beside that air block. The bottom layer requires only two stone blocks, below the two air blocks of the middle layer. The bloomery block itself must then be placed in the side opening to form an access hatch; if constructed incorrectly, it will not be placeable. The stone blocks can be any kind of stone (including multiple kinds) and in any form (raw, smooth, brick, or even cobble, including mixed forms, though cobble may require additional blocks due to its sensitivity to gravity). The spaces outside the basic structure can be left empty or filled with any material as desired, though the top of the chimney must be left unobstructed.
Beyond the basic structure, the chimney may be extended by adding one or two more layers identical to the top layer. Doing so expands the capacity of the bloomery to 2× or 3× (respectively) its original value. The chimney does not need to be open to the sky for the bloomery to work; in cold regions, it may be helpful to build a roof over the chimney to prevent snow from accumulating inside the structure when not in use.
Usage
The bloomery can smelt up to 8, 16, or 24 items per use, depending on the chimney height. Each item may be:
- an iron ore lump
- a wrought iron tool, tool head, or ingot
- an iron bloom from a previous bloomery operation
To operate the bloomery:
- Open the hatch, if necessary, with
 Right Click.
 - Place eight charcoal at the bottom of the chimney using ⇧ Shift+
 Right Click.
 - Close the hatch.
- Climb to the top of the chimney.
- Drop the items to smelt into the chimney with Q.
- Drop charcoal into the chimney with Q equal to the number of items to smelt. Adding too little fuel will prevent the bloomery from lighting. Adding too much will work fine, but wastes fuel.
- Use a firestarter or flint & steel on the hatch to light the fire.
- Wait for 15 in-game hours for the smelting process to complete, at which point the fire will extinguish.
- Open the hatch with
 Right Click.
- Use a pickaxe to break the raw iron bloom in the bloomery.
The iron bloom can then be worked on an anvil into a refined iron bloom, split into smaller pieces, and eventually worked into useful items.
